Showing posts with label Craft Supplies. Show all posts

Saturday, August 25, 2012

Time Out/Calm Down Bottles

 I have seen this idea a few places, but the main site I used for my instructions was here. The idea is that you make this awesome glitter bottle for your child and you shake it up and hand it to them when they go to time out or just need some relaxing or calming down time and when all the glitter has settled then they are out of time out or ready to come back to being with the family. I have a little one that sometimes has a hard time verbalizing her frustration and gets a bit upset about stuff and I figured this would be perfect. I idea for her was more just that giving her something to distract herself would help her collect herself and calm down until she could handle things more reasonably. I have really liked it so far and it works.
 
Supplies (I made two different ones):
-Plastic bottle (I used a Wal-mart brand sparkling flavored water bottle. The instructions I read used a Smart water bottle)
-Glitter Glue (I could have used more glitter glue for as big of a plastic bottle as I used).
-Goo Gone to remove you bottle label.
-Super glue
-Clear Gel tacky glue (I bought mine in the craft section of Wal-mart)
-Water
-Stirring stick
  
After I Goo Gone-ed our labels off, I filled the bottle half way with hot water. I had read that if you use hot water that is helps the glitter glue mix is better. The girls added their glitter glue. They each used the full bottle, and like I said, we could have used more.
 We filled it closer to the top with more hot water and stirred the glue around to mix it up.
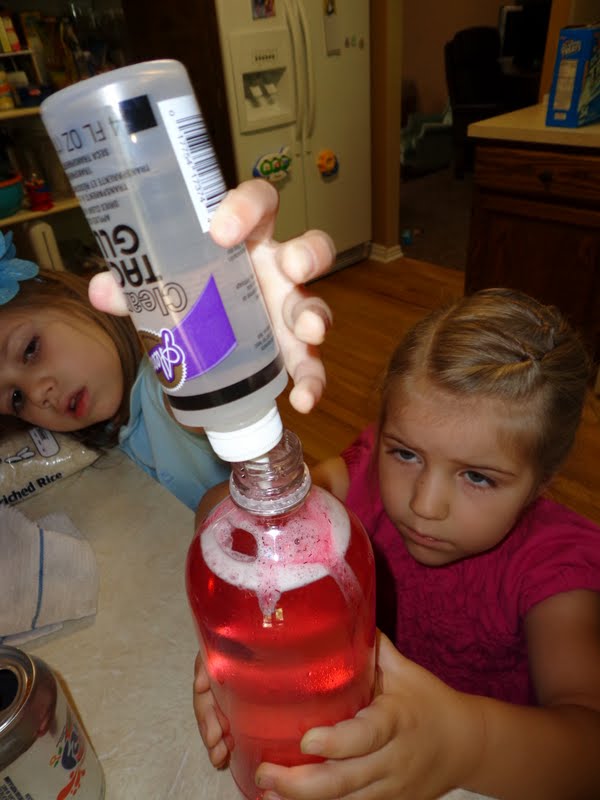
 Added our Tacky Glue. This part of sort of a bit of trial and error. I would add some, put the lid on the bottle, shake it up (yes, it leaked a little since the lid wasn't glued on) and time how long it would take the glitter to settle. I was aiming for about 5 minutes because the seemed about the right amount of time for my daughter to calm down. I later learned that after the bottle is complete and been sitting for a day or so that it thickens just a bit and so mine actually timers longer than 5 minutes now, but it still gets the job done. Once you have added enough to make the glitter settle at whatever time you are going for, make sure your water is to the top and put the lid on. (I think I maybe half a bottle of this tacky glue stuff between my two calm down bottles.)
I used just dollar store super glue to glue the lids on and that has worked perfect. We have dropped the bottle, rolled it, shaken it, etc and there hasn't been any leaking.
 Here is a bad picture of the settled version on the left and the mixed version on the right. More glitter would have been better, but it is still cool.
We discovered they looked super awesome in the sun when they were all shaken up. The girls had fun making them and they serve a good purpose in our house. I consider it a double success.

Sunday, July 1, 2012

Fine Motor Skills Activities: Part 8


To repeat what I said during "Fine Motor Skills Activites: Part 1":
"I have been busy lately doing activities with my kids that are more learning-type activities and not as blog friendly as kids crafts. I wanted to do a series of post about fine motor skills though because that is something we have been focusing on at my house. My daughter started kindergarten this (last) year and I spent so much time before kindergarten making sure that she knew her letters, sounds, shapes, colors, starting basic reading and site words, etc that in retrospect I didn't probably spend as much time on fine motor activities like writing her name and scissors as I should have. She is a little behind in those categories so I searched the internet for a variety of activities I could do with her that would help her fine motor skills that were fun activities and not just practicing writing letters and scissor cutting (although we do that too). I thought maybe this might be helpful for someone else in my same position. I actually made a little fine motor activities bin that we work from and she just gets to pick activities from it and the best part is she gets excited about it and doesn't know she is 'working'. "

-Melty beads
-Metly beads template
-Paper to put over the melty beads that you iron on (ours came with our melty beads set)
-Iron

I knew this project was going to take some time and be just a bit harder for my daughter because of the fine motor skills required. (Just as an update, she is improving all the time, still is a bit weak in her fine motor skills, but all these activities and others have helped A LOT!)
I had bought some of these buffet trays from the dollar store to use for a couple different learning things we do, but they were also just perfect to use to pour our melty beads into to use more easily.
There is the great pincher grasp that I like to talk about being important for working on fine motor skills. See all those little pegs she had to put a bead on, that was a lot of pincher grasps. :)
What I loved was that it kept her interest until the very end of the project. It took her a full hour to place all those beads, but how great that she finished it and got all that fine motor in.
It looked too fun for me not to make one too, so here is mine.
Place paper protector over the beads. Iron (as directed).
 
Pull paper off and place on the opposite side and iron again.
They loved doing it. We had to make more a couple days later.
 
Our finished product!

Thursday, June 28, 2012

Bottlecap Necklaces


I like to make these necklaces for myself and my kids for all kinds of things: holidays, their favorite cartoons, etc. My husband and I were trying to think of some way to keep my kids interested when we went to Yellowstone a couple weeks ago. We were trying to think of some badge we could give our kids when they spotted certain things in Yellowstone. So we found a list of 10 things we wanted them to try and spot or do while in Yellowstone.  For each thing they spotted or completed they would earn a necklace badge my husband and I made for them. It worked just as we hoped. Both my older girls were thoroughly searching while we drove and walked through the park and were super excited each time they earned a new badge necklace. They loved wearing their necklaces throughout the whole trip. It was a hit and we think we might do something similar on future trips. What is extra fun is that is becomes their trip souvenir too.
 
Supplies: (I got almost all my supplies on etsy.com or from craft stores or Wal-mart)

-Diamond Glaze
-Craft glue (I used super glue because I was in a rush and didn't have any more craft glue. I wouldn't recommend super glue. It worked, but not as well as craft glue)
-Small hammer (mine is a craft hammer)
-Nail setter
-Something to nail on (I just have a chunk of wood. I always just use this same one.)
-Jump rings
-Jump ring splitter
-Clips (I think I bought these at the dollar store and they are PERFECT)
-1" circle paper punch
-Bottlecaps (I used the flattened version)
-Necklace chain
-Tweezers
-Toothpick
-Pictures for necklaces (I just googled images and photoshopped them into 1" circles and then printed them at Costco. I tried to use my own printer for the pictures once and the colors bled.)

  
I store almost all my supplies in this fishing tackle box and it is great to just be able to pull it out ready to go when I come up with a new necklace idea to make. 
I use a template like this in photoshop to get my pictures the correct size for bottlecap necklaces.
 
 Here are the pictures we used. I put all the pictures on one 4x6 page in photoshop which saves me money on printing.
 The bottlecaps I bought have that little rubber sealing piece inside that I have to pick out with tweezers
 
I then take my nail setter on the concave side of the bottle cap 
 and I use my hammer to puncture through the bottle cap to make a small hole.
 I then use my jump ring splitter to separate the jump ring (it is too little that it would be very hard to open using your fingers)
 Put the jump ring through the hole on the bottle cap
 Punch out the desired picture with your 1" paper cutter
 I then like to use just a touch of craft glue to glue down my picture so that it doesn't move around in later steps. I used this super glue, but it wasn't as good as real craft glue.
 I use my claps to hold the picture in place with the glue
 I then start at the edge of the picture with the diamond glaze and work my way around in a circular motion until I get to the center of the picture and the whole picture is covered with diamond glaze.  You want to try your best to not have any bubbles. The glaze will thin as it dries, so I usually have a pretty good layer of diamond glaze.
 It will look milky like this after the diamond glaze is on and before it has dried.
 It takes a good 24+ hours to dry. I usually babysit them for the first couple hours because sometimes as they dry they can form air bubbles that I like to pop with a toothpick carefully. I just check back every 15-20 minutes for the first 2 hours or so.
 Once it is dry I put it on my necklace chain.
 Here is my cute girl searching desperately for a fish in a river in Yellowstone. She was so focused to try to earn her necklace badge for seeing a fish. :) Cute.
Here they are with almost all of their badges. I am so glad we did this, it really added something to the trip.

Tuesday, June 26, 2012

Suncatchers


So this isn't some great homemade craft, but my kids liked doing it and it reminded me of being a little kid again, so I thought I would share.  

Supplies we bought at the store:
-Suncatcher
-Suncatcher paint (mine came with a brush)
-Mini suction cups for the window
 All three of my girls loved this and asked if we could get more to do. They are super cheap, like less than a dollar at Wal-mart and they had lots of fun painting them so I think we will get more. Ya know, just one more thing to fill the summer time. :)
 
 
I was having too much fun not to paint one myself too. :)