Showing posts with label Christmas. Show all posts

Friday, December 6, 2013

Paper Strip Tree

 This post is a project we did last year around Christmas time. It's great for any age. My kids ranged between 2.5 and almost 7.
 When I saw this idea on Whatever... I thought it would be a great way to use a lot of Christmas scrap paper I had left over from another project.
Supplies - lots of patterned green paper, scissors, glue stick, and if you want to save some time, a paper cutter.
I cut out the paper in various widths. I cut those strips into various lengths (something a child could also very easily do). Once we had a pile ready to go, I let everyone chose a background paper.
From there is is just gluing. It might be helpful to lay out the tree before gluing, but winging it is sometimes more fun. Either way will obviously work.
It's meant to go from longest strip at the bottom to shortest strip at the top to look like an evergreen.
We are not picky about that and figure the kiddos should just do what they can. Just gluing down the strips is good work for those cute little hands.
And my little artist had a tree set up to glue, but changed his mind and decided to make his into a shark instead. The point is to create and that he did!
The three individual creations side by side.
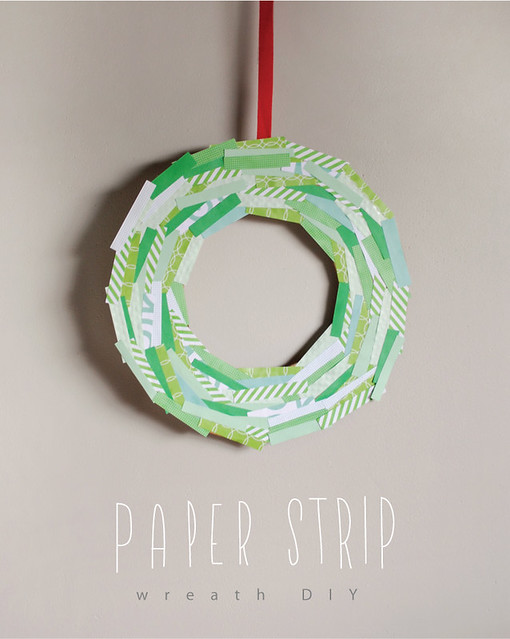
I still have papers left over, so maybe this year we will make a wreath like this one featured on Mer Mag. 

Saturday, December 22, 2012

Festive Fridge

 Yes, Christmas is only a few days away. It may feels like a short time for you, but for a kid those are a LONG few days. It was with this in mind that made me go ahead and do a few Christmas projects I'd figured we had run out of time for.
from I Can Teach My Child
I've been wanting to make Christmas tree advent calendar for a few years. I loved the one we had while I was growing up. Every year December 1st comes along so quickly that I haven't gotten to it yet. So, when I saw this idea I thought that it was a perfect temporary version of the tree. BUT, I'd have to go buy a big piece of flannel and another errand was not something I wanted to add to my endless "to do" list. I had a few other solutions running through my mind when I saw this magnet idea on Young House Love and my ideas all came together as a real project.
 I just happened to have some small plastic ornaments that I bought last year. I used about half to fancy up the wreath on my door and used what was left over. Add in some magnets and strong glue and you are ready for half of the project. This could be the end of the project too if you liked.
 My son and I glued the magnets on the ornaments and set them in an egg carton to dry. (The few that had glitter on the surface have not held together as well as the plain ones.)
 
 Once dried they found a new home on the fridge.
 Like I said above, the project could end here because not only are they festive on the fridge alone, but are fun for kids to arrange and re-arrange. But, I took it a step further.
 Awhile back I had seen an idea for painting contact paper and using it as temporary decals on the wall. I don't remember what the original link was, but used this one from 31 DYI. When the tempera paint I used above dried all flaky, I referenced the website and saw that she used acrylic paint. So, ignore the tempera above and replace it with regular craft paint. Also, I had both clear and white contact paper. Either would work, but I chose the white since I think I have more other uses for the clear.
 Anyway, sketch out a triangle for your tree (measure your space first) or just eyeball it and begin to paint.
 Enlist a small helped to make creating the project a kid thing too, not just the final product. (I admit, I did go back over her painting to make the brushstrokes look more pine tree-like.)
 Once the paint is dry, just cut out your tree and carefully pull of the backing on the contact paper. I started at the top and pressed it down on the fridge as I went.
Add the ornaments and it's time to play!
I have 2 other Christmas projects we did this past week, but I'm not sure If I will have time to post before Christmas, so I may post them after Christmas or just hold on to them until next year. Any preferences?

Thursday, December 13, 2012

Beaded Candy Canes

As promised - a Christmas craft! This is far from a new or original idea, but it is still one I was very excited to do with my kids.
This was 1983. Our family Christmas tree for many years was full of homemade decorations. Along with painted ceramics, cross-stitches of wreathes and candles, and reindeer made out of old school clothes pins stained brown were these simple candy canes made from beads and pipe cleaners.
My hope was to make them last year, but I must have waited too long in the holiday season because the craft store was all out of the right beads. They are these funny looking ones as picture above. They likely have a fancy name.
Afraid I would not have good luck at the store again this year, I went ahead and order kits from Oriental Trading. I would suggest this only if you can't find what you need.
Otherwise, head to the craft store and pick up a package of pipe cleaners (red or white) and two packages of beads - one red, one white.
Each candy cane will need 25 beads of each color, so 50 per ornament.
The  way I made mine is to put on 2 beads of one color, then two of the next. leave about a half an inch or so between the fist bead and the end of the pipe cleaner. To speed things up I put on 4-6 and then slid them down to meet the beads at the bottom. My boys preferred to put on one at a time sliding each the entire length. I tink this si why they burned out after making 2. That's okay though. :)
Once all 50 beads are on, fold the ends in towards the beads so they won't fall off. You may have to trim the pipe cleaner down a bit. Then just bend into a crook at one end and you're done!

Wednesday, December 5, 2012

Candy Cane Marshmallow Dipper


 We were trying to think of an easy and fairly quick treat to make together the other night. I had seen this idea here for making these candy cane "pops", as they called them, to use with hot chocolate and thought it would be perfect. My kids and I are big fans of hot chocolate. 
Supplies:
-Large marshmallows
-Small candy canes
-Wax paper
-Hot chocolate of your choice
-Rolling Pin
-Chocolate for melting (I used these chocolate chips, but in the future I would use normal candy making melting chocolates)
 
As I frequently mention, I like to see what fine motor skills practice we can get in during our projects and this time I was surprised to note how hard it was for my girls to get the candy canes out of the little packages without breaking them. 
 
We opted to use scissors to open them (which is still fine motor practice, I guess). :) So we unwrapped a  bunch of little candy canes.
 We used a rolling pin to crush a bunch of still wrapped other candy canes.
 We then stuck the long end of the candy cane into a big marshmallow. They liked this step. I was surprised that even my 2 year old could do this step well.
 
We laid out wax paper, put our crushed candy cane bits on a plate and melted our bowl of chocolate chips. I made sure our center was all ready to go before we melted the chocolate because I know how fast that melted chocolate will harden.
 Like I said before, I wouldn't use chocolate chips again. I think I over heated the chocolate because it wasn't smooth after I heated it. Ours got kind of clumpy so we couldn't just dip the marshmallow. We had to sort of "paint" or spread the chocolate on. It was fine because they still thought it was fun.
 Immediately after they spread the chocolate they  rolled the chocolate covered marshmallow into the crushed candy cane bits.
 Ta-da! I thought they turned out pretty cute, even if our chocolate was a little weird.
 The kids loved them and dipped them in their hot chocolate then would eat part of it and then dip it again. I opted to dump my whole thing into the mug and let it melt to add some yummy flavor to my hot chocolate. We put the rest that we made into a baggie and froze them until all the way cooled and hardened and have them ready to use for our next hot chocolate drinks. It was a hit and I would definitely make them again. They would also make really cute neighbor or teacher gifts.

Tuesday, January 10, 2012

Fine Motor Skills Activities: Part 2

To repeat what I said during "Fine Motor Skills Activites: Part 1":
"I have been busy lately doing activities with my kids that are more learning-type activities and not as blog friendly as kids crafts. I wanted to do a series of post about fine motor skills though because that is something we have been focusing on at my house. My daughter started kindergarten this year and I spent so much time before kindergarten making sure that she knew her letters, sounds, shapes, colors, starting basic reading and site words, etc that in retrospect I didn't probably spend as much time on fine motor activities like writing her name and scissors as I should have. She is a little behind in those categories so I searched the internet for a variety of activities I could do with her that would help her fine motor skills that were fun activities and not just practicing writing letters and scissor cutting (although we do that too). I thought maybe this might be helpful for someone else in my same position. I actually made a little fine motor activities bin that we work from and she just gets to pick activities from it and the best part is she gets excited about it and doesn't know she is 'working'. "

For this activity, we did something sort of generic but it turned out to be a GREAT fine motor activity. I am a little slow at posting this since we did this before Christmas, but the same principle applies to any time of year. 

 Supplies:
-Cheap foam art kit that includes small stickers.

I actually bought these at the dollar store.I hadn't intended that putting little foam stickers on a foam tree/stocking/gingerbread man would be a fine motor activity, but it really was as they had to peel the back off of each of these little stickers.
 My daughter happened to use the tiniest pieces of stickers, which was great for her little fingers to have to focus so hard and use those tri-pod fingers (index, middle, and thumb) which are so important is doing any fine motor activity.