Showing posts with label Science. Show all posts

Tuesday, June 18, 2013

Magic Balloon

If this picture doesn't tell you enough how awesome this experiment was, you will definitely have to try it with your kids.
Simple supplies - empty bottles, vinegar, baking soda, balloons and a funnel.
Fill the balloon with baking soda using the funnel.
Put just a little bit of vinegar in the bottle. Maybe half an inch or so.
Put the end of the balloon around the mouth of the bottle and let the baking soda drop into the vinegar.
The balloon will blow up-up-up.  
Super awesome.
Note this - for some reason when I have seen this one floating around on Pinterest, the comments claim it is a replacement for helium balloons. This is so NOT the case, so don't expect that. 
Have fun!

Sunday, March 25, 2012

Rocket Bottle

 My oldest went to a super cute space themed birthday party and came home with this. It is a super easy and fun science experiment displaying how powerful air pressure can be. All you do is fill it with some water, pump air into it and it really takes off!
 To make your own, you will need:
- an empty plastic bottle (this was about 20 oz) 
- some sort of stopper to fit in the top. Ours had those things you can put at the bottom of chair legs like THIS, but I'm sure a cork or another type of stopper would work great. It just needs to be something that fits into the bottle snugly and you can put a hole all the way through from top to bottom. (Hopefully I explained that okay.)
- cardboard other other stabilizer to make legs to hold it up while it's filled with air
- duct tape to attach legs
- a bike pump with a needle
- water
Since I know it I'm going to explain this well, I found this website that might explain it better (and it gives another variation of a launcher). Basically what you will do after you have put a hole your stopper and built some kind of stand or legs for your rocket is fill it up with a few inches of water (and feel free to experiment with all kinds of water levels). Stand it up with the stopper facing down and the cone (if you made one) facing up. Put the bike pump needle in the stopper and pump air into the bottle.
 This was our first go at it and we were quite surprised at take off.
The second time the rocket blasted so far it got stuck on the roof! I guess that is proof that it truly does blast off. 
Have fun making your own rocket and I'd suggest that an adult or older child be the one to pump the air in. We had out kids stand back a bit so they wouldn't get hit.


Saturday, September 24, 2011

Science Saturdays: Ants!

Kids often get excited about science when they see big experiments and can mix things together to make something new. I admit, I still remember how awesome it was seeing my 6th grade teacher make green fire! But, there are other more simple parts of science that are just as important and also are fun. Basic exploration. No fancy tools or chemicals needed, just you and your 5 senses. Like watching ants.
 I was in the backyard and saw a streaming line of ants. I called my son over to look. We always look at big piles of ants, but this different. The ants were flowing out of two holes no where near each other and converging like the shape of a "Y" to another hole.
It was fun to imagine why they were all heading the same way.
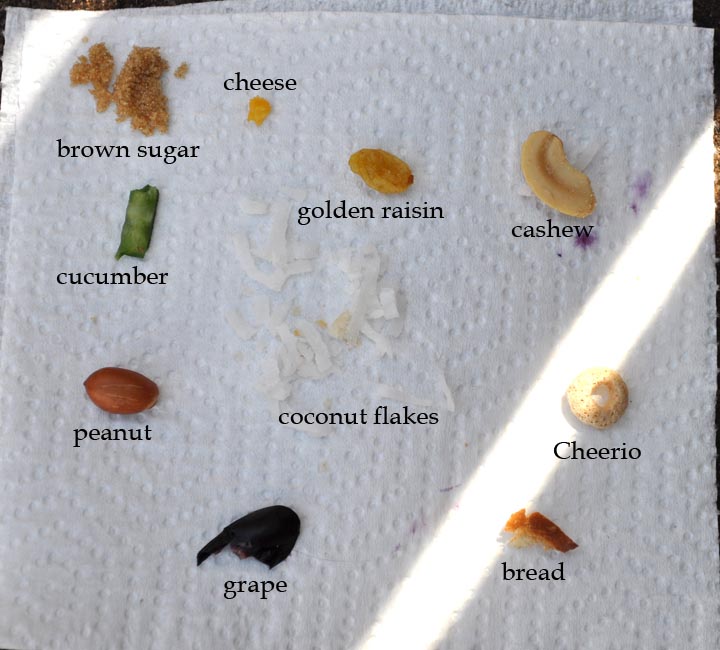
 We were still thinking about the ants the next day, so we tried a little something I read about on FIMBY. We wanted to see what ants would eat.
  Here is what we started with.
 The first thing to go, and quickly, was the coconut flakes. We watched this one particular ant for a bit.
 He would trudge along and when he would get to a tricky spot along the way he would let go of the food and feel out his different options ahead.
 Then finding the best route, he'd keep going with the food.
 And some of the ants worked together as a team, making the food get home faster.
 See all those white specks? Word got out that there was free coconut! We checked out napkin full of snacks throughout the day and into the evening. It was interesting to see what appealed to the ants the most and which foods they seemed least interested in. It rained that night so we didn't get to see if anything was left in the morning. However, the video below (SUPER short) shows a few of the stages of food removal. Observe how they started "sawing" the peanut and cashew.
I think we will be doing this again!
More about ants:

Monday, August 1, 2011

Make Shrinky-Dinks

  One afternoon, this is what my sink looked like - full of containers I was saving for these Garbage Goodies projects we've been working on. I cleaned all the bottles and containers.
Then when the sticky stuff still wasn't coming off of some of the plastic, I used the peanut butter trick. (Spread a thin layer of peanut butter on the spots that stay sticky after you remove a label, let it sit then scrape off.) I was set to go on making my own shrinky dinks until I re-read over how to make them and realized my plastic wasn't the right kind! Way to pay attention genius! I though I just needed strawberry, etc. containers, but, wrong. I needed #6 plastic containers. Ugh.
Lucky for me when we went out for our mid-week family lunch date with my husband at Chick-fil-A, I noticed out kids were #6! Hooray! They saved cows and my project. (And my other plastic containers didn't totally go to waste, as you will see later this week.)
Now on to the project. I used a few sources (Poopscape Projects, Show Tell Share, and Skip to My Lou), but mostly Curbly. Some of the direction are different in each of them as far as temperature goes, but all of them say you must use #6 plastic (and #6 Styrofoam also works). Gather your supplies. (You can use colored pencils instead of markers, so long as you sand one side of the plastic to roughen the surface of it before drawing on it.)
My boys scribbled, made patterns and drew pictures on their plastic.
We used the lids first. On one of them my son insisted that we not cut any bumpy edges off, so i didn't.
It came out flat, as if there were never edges. I will not though (and it is exaggerated here because he filled in the words) that if you do have words or anything like that on the plastic you are working with, you will still be able to see the texture of it in the final product.
 So, let me back up and give you instructions. You can cut your plastic out in any shape and if you are going to want a hole in it, use a hole punch before it goes in the oven.
 You'll notice that the edges are rough on this, but once it shrunk it didn't seem to matter. You can make yours prettier though. I won't be offended. :)
For the "baking" part there is variation (see links above) I chose to use the aluminum foil method. Place your prepared plastic pieces on a piece of foil (I folded up the sides so there was a taller edge) and put in a 350 degree oven on the lowest rack. I checked on mine after about 90 seconds, but it took around 3 minutes to really shrink up.
Not the prettiest picture, but here is one in the oven. If you'll notice there is a big circle drawn on the foil. This was the original size. The plastic will shrink to about 1/3 of its original size. This is a fun part for the kids to see. 
 See that tiny guy? So cute. My boys loved how they got so small, but thicker.
 Side-by-side.

So, I was sad to discover that my biggest lid must have not been #6 plastic (or else I just started messing up somehow). When I put these pieces in the oven, they never shrunk and just spread out, getting thinner and more brittle.
This is one we will repeat again once I get more plastic or Styrofoam because everyone (myself included) had a lot of fun.
 Anytime you do stuff like this, be smart - oven are hot and not a place kids should be hanging out. You should open a window or something because it can get a little stinky. Have fun!


Saturday, July 9, 2011

Science Saturdays: OIL & WATER

Oil & Water
This day we learned that water and oil do NOT mix, no matter how hard you shake it up and no matter how many times.  We colored our water green so you could clearly see the difference. You can find our how here.

Saturday, July 2, 2011

Science Saturdays: VOLCANOS

Volcano
This was a hit with the kids.  The loved the chemical reaction between the baking soda and vinegar.  We must have done it 3 times when they decide to get there dinosaurs and play extinction.  I thought it was pretty clever of them.  It was fun to see them play and act out the last days of the dinosaurs.  You can find out how to do it yourself here.

Saturday, June 25, 2011

Science Saturdays: COLORED FLOWERS

Flowers
This was a fun summer time experiment.  We colored our water to see what would happen.  We tried red, yellow, blue and green.  Then we got a little crazy and made teal, purple and orange.  We found the flowers like the primary color and it changed to that color.  They weren't as bright as I imagined, but then again we weren't spray painting them.  It was fun to watch them turn colors.  Create your own!  Just purchase some simple white flowers water them in their vases and add food coloring to the water.  Easy as pie!

Saturday, June 18, 2011

Science Saturdays: HEAT vs. an EGG

HEAT vs. the EGG
Place the egg on the mouth of a Vita Water bottle.  The egg is to big to go through (make sure it is a peeled hard boiled egg).  Take a cotton ball, soak it in rubbing alcohol, drop it in the bottom of the bottle, light it on fire with a lighter, hurry and put the egg on top and watch what happens.  It is amazing how those heat molecules expand and then retract the way they do! 

Saturday, June 11, 2011

Science Saturdays: 'ZOP'

"ZOP"  
Here is a great instructional video on how to do it. I am not quite sure how to explain this experiment.  All you need is cornstarch and water though.  Very cool experiment...is it a solid or a liquid?!?!  We still can't decide!  What do you think?

Saturday, June 4, 2011

Science Saturdays: AIR

 AIR 
Jacqueline learned this fun one at school and came home and showed it to us that week.  We were all WOWED and very impressed.  You take a bowl, fill it with water, take a cup, stuff a paper towel or napkin into the bottom of the cup.  Next put the cup upside down right into the water.  Then bring it out straight up, feel the napkin & it will be dry!  The air is caught inside the cup and does not let the water in.  FaBULoUS!