I meant to get this up before summer really began, but here we are now - half way done. There are such good ideas all over the internet on how to make a road trip easier on everyone with kids. We took a trip last year that wasn't just a road trip in the sense of get from A to B, but more like a let's go drive all these scenic roads type. We spent a lot of time in the van. My kids are pretty good travelers, so what worked for us might not work for you. I'm not anti-movies in the van, but I did limit them big time, more on that later in the post. Where to begin though? Food. I love to eat, so let's start with snack stuff.

At the time we took this trip we only had 3 kids and used only the middle seat in the van. This enabled us to fill the back seat with our stuff and use the very back as a refill/storage station. The photo is pretty self explanatory. When on trips we try to not eat out except for dinner, and not always for that either. We stay at places that have some sort of breakfast and have lunch supplies to either make sandwiches in the morning or later on the go. The cooler was full of carrots, green and red pepper strips, grapes and things like that to use both with lunch and as snacks. We'd also put drinks in there so there was always one cooling while we had one. The kids mostly drank juice boxes (and I prefer to get the real juice when I can, not just Kool-aid), but also bottled water. When the water supply ran low, we'd refill the bottles in the room that night. Let's see - baby or no baby, wipes are so handy to have for cleaning up. Extra sandwich bags for left overs and bigger bags for garbage are handy. We forgot to pack some laundry soap kits at home, so we got the smallest box we could find at the grocery store at one of our stops. This way you can do laundry in the hotel for a little less (they usually charge a rip off price for a 1 load box of detergent) - or, of you really have to - in the tub. The snack refills were snack sized bags I'd prepped before we left so I could just switch them to the front when we ran out. So, moving on to the front.

I aimed for healthier snacks that would keep them fuller. So, in that regard we have fruit leather (buy in bulk at Costco to save $$), PB crackers (ok, not super healthy, but PB has protein to keep those tummies happy for awhile), raisins (a mix of golden and regular - and really any dried fruit is great), and trail mix. The more fun not so great for them stuff was a mix of like 4 different sugared cereals and then a pretzel goldfish cracker mix. And we did have some full on candy too, because a trip without Red Vines is just plain wrong! So, this basket sat up in front on the floor by the console between the driver and passenger seats.
Moving back now. Right behind the console was a small cooler. In here were the active refrigerated snacks - like fruits and vegetables. That would also get refilled as needed. And then behind that was the bag of fun.
I would control how slowly these things came out. Sometimes the anticipation of knowing there were things in there that they wanted but had to wait until the next day for made them even more fun.
I bought a book of mazes and ripped out all the pages so they could be put in plastic sheets. The kids would do them with dry erase markers and then flip it over for another. Once those were done, they could erase and start all over with another set of mazes within the plastic page protector. I used a few of those so more than one kid could do mazes at once.
Magnetic fun! The pipe cleaner bottle I made was not as awesome as I hoped, but they still played with it. (Idea from
here)
No matter how old my kids are, they have always loved these Mangadoodles (well the generic cheap ones).
I remember loving these as a kid, Wooly Willy, anyway. I think these frustrated me kids some, but they still happily took turns using each of them.
I got these Colorform paper dolls at a thrift store. They are a great travel toy and keep small ones entertained in the car or even just waiting for the doctor, etc.
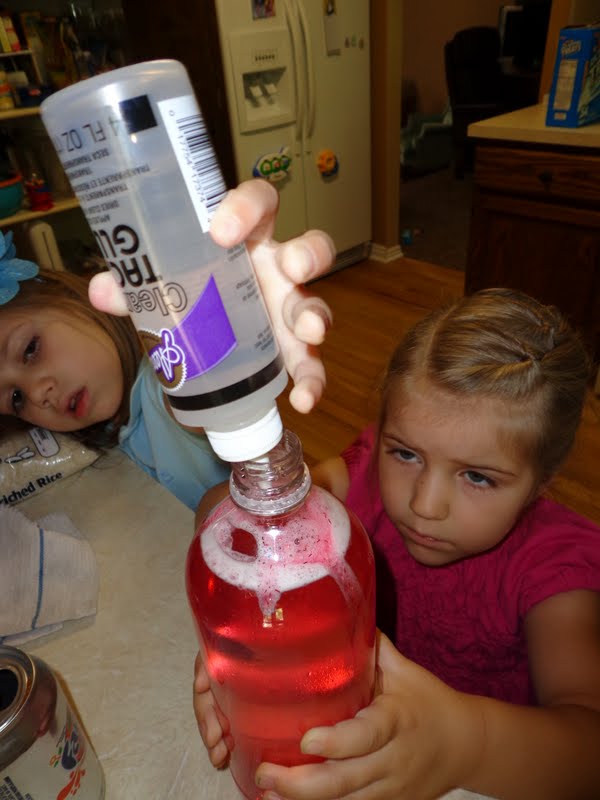
I made 2 I-spy rice bottles. There was no list to look off of. I just wanted them to try and find whatever they could. I filled them with rice, some odd and ends and things I have bought over the years for such a project. I used a glue gun to seal the top closed.
These were all new items (purchased from the dollar section of Target). We actually never even got to all of these during our trip. I tried to limit how many new things I got out each day.
Books are such an obvious choice, aren't they? I think they are great for them to look at in the car, but also to have some to read to them in the hotel room, or even as you drive.
Ever wonder what to do with all those kids meal toys? Well besides filling a shoebox full and giving it away as a white elephant gift (I did that, totally awesome), put them in a bag for trips. By having a random mix of these small toys, your kids will be able to create all kinds of imaginative play and funny stories with the objects.
Pipe cleaners. Chenille stems. Fuzzy sticks. Whatever you call them, they should be a standard "go to" source of entertainment for kids. We use them all the time.
Years ago we took our 2 boys on a road trip that went from Pittsburgh though Ohio, down to Atlanta and back up to North Carolina. It was a 2 week long trip and still remains one of my favorites. Anyway, The kids were 2.5 and 3.5 at the time. All that we brought to entertain on the plane, in the car and in the room were 10 pipe cleaners, like 20 pony beads, a couple of straws cut up, 10 mini plastic animals, a bag of crayons, pad of paper, half a dozen books and some stickers. (Now it sounds like a lot typing it out, but it took up virtually no space, so it really didn't seem like much). Anyway, the kids got so much use out of it all, especially the pipe cleaners. They made bracelet then undid them to just make patterns with the beads and so on.

They are bigger now and last summer during our road trip through Idaho they used a few more pipe cleaners and expanded their play to include "locking" themselves up and using them as bottle holders. If this isn't proof enough of how awesome pipe cleaner play is, go back and check out
Natalie's post where they make animals from them!
This isn't the greatest duo of pictures, but you'll get the point. The ever-fun lacing cards (see the pig hiding there?) can go beyond what they are made for. My boys love using the laces to tie things up and weave them around other toys (or themselves).
Another simple plaything is a mini felt board glued to half a manilla folder stapled shut.
By using the folder you have a little hiding place for the pieces. You can be way fancier, but I just went with basic shapes. Another thing I remember having as a kid was a piece of felt glue to the top on a pencil box with the pieces hidden inside. They can just make their own scenes or if you have more than one, they can play a game where they recreate what the other has made (even if the colors don't match).
Another item that I had hidden away for the kids was aluminum foil. You might remember
Natalie's post on how they used it on a road trip. My kids opted to play a game with it. It was my daughter's 2nd birthday (such a fun way to celebrate- a car ride, right? I promise we did something fun - cake and presents at a park!) and the kids kept hiding different object in foil and took turns opening them. They were so entertained. Seriously, what's more hilarious than a
carrot wrapped in a foil ball given as a gift?!

Not the best picture, but still gets the point across. Books are great in the car. Some kids get motion sickness and might not be able to read/look at books very long. We have them stop and just start out the window until they feel better. And if they don't? Well, a brown paper bag (like lunch bag sized) lined with a plastic grocery bag makes for a great barf bag. (Better yet, pull over for that business if you can! Lucky for us we deciphered "my mouth feels weird" as a warning sign.)
Another item you might want to get (or make!) is a neck pillow. She is totally fake sleeping.
The kids mainly used them just for fun as we were driving and not really for sleeping. I forgot we weren't really going to be driving much after dark so that rendered them a bit useless for this particular trip.
That same scenario is why we didn't use the glow sticks and glow-in-the-dark animals. However, I'm glad that I have them for another time.
I made kits for teach kid to go in the back seat pocket. The pencil bags for the boys had colored pencils and for my then 2 year old had crayons. they boys each brought an big activity book and we got something similar for my daughter. Then I made mini books that were several piece of paper folded in half and either stapled or sewn together. The final part of their kits were 3 pronged folders filled with activity pages (**see below for sources).
Before I jump into the boys' here my daughter's. I just put some extra copies of the pages I game the boys and also printed a few coloring pages. I knew she would just want to have her own folder like her bros, but wouldn't be able to do some (most of) the activities. She was happy to just color whatever she got.
We used the hundred charts to tally certain things. For instance, you could say - ok, I'm going to find 100 cows or yellow cars or water towers. I gave them a couple of sheets in case they filled one. These were loose in the front pocket of the folder.
The kids shared dry erase markers for the mazes and a few other activities like this. It's a variation of the alphabet game, pretty self-explanatory.
Next up were some bingo/I-spy/scavenger hunt sheets.
Counting cows.
More I-spy and my favorite of all the print outs - the license plate game.
Matching shapes to objects found out the window and another bingo. On a recent trip we took I brought nothing for the kids to do for a 3-3.5 hour car ride. Not sure what I was thinking, but they were actually fine on the way there. On the way back though, they needed something to do. So, I just wrote up a list of random things to find, like - 10 semis, a horse, 2 trains, a car with a bike rack, 7 red cars, etc. It was fun for them and I was able to write the list based on our surroundings and make it unique to that particular trip.
In the back of the book was another dry-erase activity. I printed out a map for the kids so that they would be able to follow along and mark our roads. This really could have just been down with their colored pencils, but I have one son who I know would have a mini melt down if he messed up on his map. In the back pocket of the folder I had some print outs of journal pages.
When the boys felt like it they could write about something special that particular day. This is one of my favorite souvenirs.
Here is some of what the aforementioned blank mini books pages became.
Another note on maps. There are freebie maps often at hotels or rest areas. It's fun for a child to open up those huge things and look around on them.
One suggestion I had read and others had suggested to me was to try audio books (I have to try really hard not to say "books on tape!") So, got a few CDs and checked out books to match them so the kids had something to look at while they listened. I don't know if they were just too young, if I started with a boring book or if the British accent of the reader threw them off, but they didn't like it. So, we abandoned this idea. If I remember right, I ended up just reading them a chapter book. And if my memory is wrong, well, then it is still a good idea. :)
I'm not anti-video games. I think they are fun and can be educational. I think they should be used within reason though. My kids have really liked their Leapsters and they did get them out a few times on the trip. I put both Leapsters in a mini backpack along with headphones for each, spare batteries and their games. This enabled them to be in control of their belongings and empowered them to use them correctly.
Another media option we used were DVDs. I opted to get a pile or random ones from the library that they had never seen. This was very successful. They usually only got to watch one DVD a day, but on a particularly drivey day after several days of already driving, we let them watch a few. It made us happy to hear them laugh their heads off at old Micky Mouse cartoons, be introduced to Looney Toons, etc.
Last thing - take breaks outside of the car. Pack a lunch and eat it at a park with a playground. Let them run around and get some fresh air. It may add another 30 minutes to your drive, but it will make everyone happier.
A few others that had great ideas were
Connecting Family and Seoul which featured some very clever sensory bins for the m/hotel room,
Play Dr. Mom shared carious creative tricks they use,
Sun Scholars had great ideas rounded up from around the web, and lastly,
Aggieland Mom posted about something their family has used. Truly, there is an abundance of great ideas and different methods of making travel fun even during the parts where you are just looking at what seems like the same field or ranch or pine trees for hours on end.